Showing posts with label garten. Show all posts

Wednesday, August 22, 2012

Planning the Gardenqub

Ok all the parts are in place for the first gardenqub to be constructed. A willing client, metal supply, timber decking supply, quotes, delivery times, tools, crane hire (the roof element is going on in one go because of the size), labour logistics, crates of beer, pizza's, ...

Now to get all the parts in the right order and in the right spots.
For this I turned to a cool online tool called Gantto. Basically a Gantt chart creator to plan event sequences and resource allocations.
Im just using this in low power mode, but seems that this thing can do much more than I am asking of it.

Here is a screenshot of the resulting chart

Thursday, August 16, 2012

The Ringryll - the social barbecue


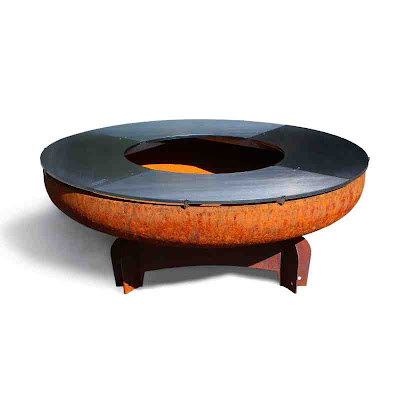
Yagoona Ringryll feuerschale ring barbecue feuerring
Yagoona Ringryll ring barbecue a top the Yabbi Firepit


As you all may already know, from a barbecue design perspective, my design focus is in the category of wood burning barbecues.

It you go back in time on this blog you may get a glimpse of the Barramundi Barbecue, and again I notice a woefully inadequate coverage on this product in this blog. Will have to correct that soon.
To stay on the subject though, the Ringryll.

With a veritable over supply of mega gas grillers and now with the emergence of electric barbecues, the traditional solid fuel barbecues seem to have been forgotten.
But there have been a few new grills in the European market that target barbecuing as a social activity. This is where the Ringryll comes in.

The basis of this barbecue is the standard Yagoona firepit (feuerschale in German). A decorative item for the garden sitting area. Atop this fits a frame and 4 heavy steel plates that when assembled create a wide ring that straddles the edge of the firepit.

Yagoona Ringryll feuerschale ring barbecue feuerring


The operation of this barbecue is very simple. A fire is started in the center of the Ringryll inside the firepit. The fire will heat the heavy metal of the cookplates. This is where you cook. The closer to the inner edge, the hotter the plate. The outside edges of the plate will typically not be so hot making this zone ideal for slower cooking foods.

Yagoona Ringryll feuerschale ring barbecue feuerring

The ring design is intended to maximise access to the cooking surface and allow your barbecue guests to cook their own food. Classic Swiss "cook it yourself" fondue style.
The complete 360 degree access to the cooking surface creates that strong 'gather around the fire' feeling.
 
Just prepare a whole variety of raw foods such as stuffed mushrooms, mini skewers, chunky sliced potatoes, supply some sauces and seasonings and let the fun begin.
Virtually anything that can be cooked in a pan can be cooked on the Ringryll.

Yagoona Ringryll feuerschale ring barbecue feuerring

To the more technical aspects of this design. The cookplates are made from 8mm steel plate. Each one weigh around 6kg and possesses superb heat transmitting and retaining properties. The perfect surface for barbecuing.
Most importantly, the plates do not cool when a piece of cold meat hits it, meaning vastly better cooking performance and no sticking.

The entire Ringryll can be easily removed and stored leaving you to enjoy your firepit on its own. Storing away the plates protects them from rusting and enables easy cleaning of ash from the firepit.

It is important to note here that rim of the firepit be level before using the Ringryll. The Yagoona system of independent firebowl and base makes minor adjustment to level of the bowl edge easy. If your bowl is not level, then the plates will not be level and when hot, the fats will run off the edge of the barbecue.

Yagoona Ringryll feuerschale ring barbecue feuerring

When mounted, the Ringryll stands several millimeters above the rim of the firebowl. This is quite important for a healthy air supply to the fire within, and promotes better heat dispersion around the plates.

Yagoona Ringryll feuerschale ring barbecue feuerring

So even if you have the gas barbecue that is the envy of all your neighbours, you may still find that the Ringryll is an appealing option for those intimate "cook around the fire" moments with close family and friends.

For more information and purchase options, please visit the Ringryll on the Yagoona site


Monday, June 11, 2012

The new Yagoona Gardenqub

Some time ago I started to toy with an idea to create a garden pavilion. I looked around online to see what there was around and found a real lack of modern design pavilions. Those that were of a modern design lacked one thing in particular - an integrated floor!

Having had some experience with garden construction, I am well aware of the cost and effort required to create a flat paved or decked area in a garden. This cost and effort explode when the ground is not level. Berms, retaining walls, filled areas and soil compaction are all vital issues that any gardener knows about and does not underestimate.
These costs can easily dwarf the cost of the actual pavilion!

So many sketches and models later, the Gardenqub started to take shape.

A modern design, all steel, pavilion with an integrated timber decking for a floor.
The entire structure is supported by 4 feet that are set into concrete block footings.
The Gardenqub can be installed on virtually any sloping ground space (within engineering limits) and can dramatically extend the livable outdoor area of an uneven or sloping ourdoor area. This case is quite common my country of residence - Switzerland.


The frame is made from 150 x 150 x 5mm square steel pipe.
The elbows are my own design hiding the structural joining elements.
This enables a modular self construct kit product that can be put together by any gardener or handyman (with the help of some friends).

The ideal maximum size is a 4 x 4m floor space with 2.8m uprights. This size means that each of the elements remains within a weight limit which can be man handled. (This is where the friends come into it).

What was left for me was to make a full size version to verify my design. This being a large step requiring a permanent home for it, meant that my project came to a standstill until now.

A good friend of mine was recently telling me about his garden renovation plans and we got into the subject of my Gardenqub project. I moked up some 3D sketches quickly in Google Sketchup and presented them to him.

He was sold.

(His one is actually going to be bigger than I plan -  6m x 3.5m - so some slight modification is required to the base design)


So I wanted to share this initial post about the Gardenqub with you all, and give you a chance to follow the steps in the construction of my first one.

Take this as a social experiment as well since I will share with you all the joys and hardaches of the final steps of product development.

Subscribe to this blog to be kept abreast of our project.

p.s My friend is putting together the plans for the rest of the garden so looks like we will not be getting started with actual installation work before mid August.